
In the first part of this project post (click here if you haven’t yet read it), I successfully dismantled the dark, sad chimney. This is one of those projects that I was asked to hire out. Why? Well, my wife didn’t relish the thought of losing her husband to a bit of gravity and a sudden stop at the end of a short drop. However, I assured her that I’d be safe, as the pitch of the roof made this job an easy one. Also, the amount of room to maneuver around the shingled space made it nearly impossible to fall. There was no way I needed to hire someone else to do this thing of which I was perfectly capable. And boy, did I show her! It went off without a hitch. I mean, I’m writing this, so I obviously lived to tell the tale. I will say that death came a bit closer than I would have liked, but who knew I’d end up running for my life across the roof? More on that later…
I’d never built a chimney, but I had done plenty of masonry work in the form of Cultured Stone application. When I dismantled it, I noticed two of the flue liners were cracked. No problem, because surely you can just buy this standard item at any masonry supplier. Wrong. These are from the 70’s and not built the same as current offerings. However, I made it work by purchasing two modern clay-fired flue liners that fit(ish) and used them as the topmost flue liner for each chimney. I used mortar to secure them in place and then spray painted them each gray so they would match the color palette when viewing from the street. Appearances are everything, after all.
Next, I had to build up the front of the chimney, because it protruded a bit farther than the backside. I’m still not sure why that was, but I found it necessary to re-build it in the same shape so I wouldn’t have to change the flashing. I’m not a chimney expert. Surely “they” built it like this for a reason. I wasn’t about to change it.
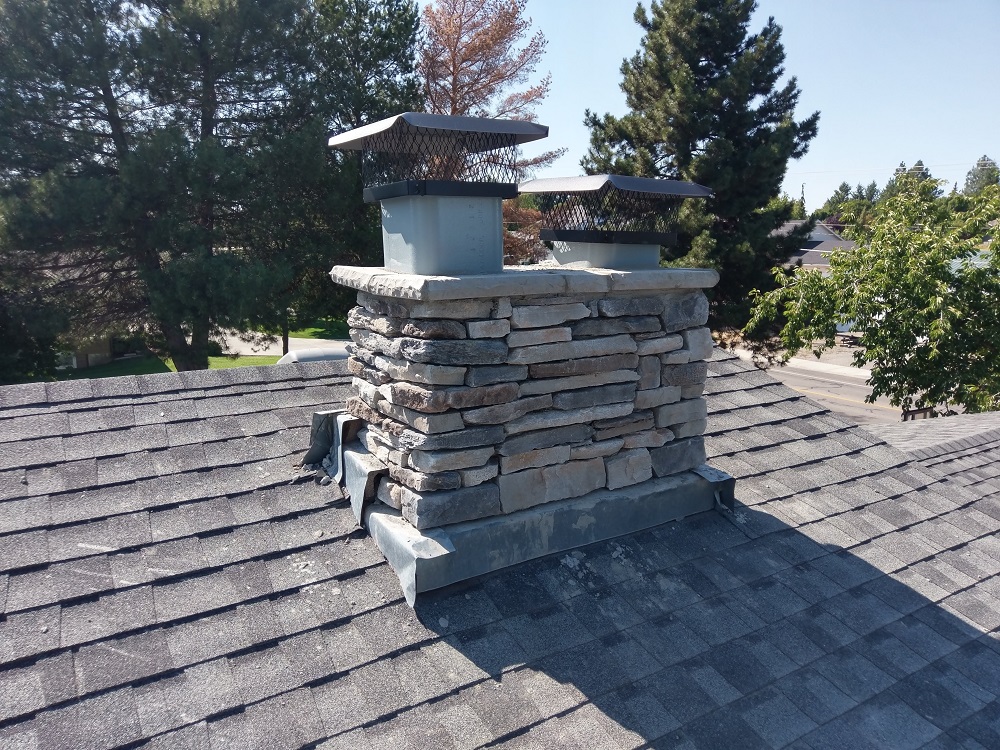
After building up the front-side, it was time to apply a scratch coat with Type S mortar. I also added the flue covers, which gave the chimneys a nice, polished look. After the scratch coat set, next came the Cultured Stone corners, followed by the facings. Pretty standard. The rain sills were something I hadn’t done before, so when I got to the top, I had to think through how I wanted it to look. I searched for mitered rain sills for awhile before learning they aren’t made mitered, so I bought a 12″ diamond blade for my miter saw and cut the 45 degree angles myself. That made quite the mess, but it was successful. After mortaring the rain sills in place and applying mortar to the joints, the last step was filling the crown with cement.
Earlier, I referenced the fact that this project was completed without harming myself or others. That’s mostly true. I’m not counting the dozens of yellow-jackets that I gleefully murdered in process. They had it coming. They attacked first. Sure, I was destroying their habitat, but they didn’t hold title to the home. Squatters get squatted. In any case, I was minding my own business, chiseling away at the igneous sadness, when they swarmed in slow motion out from the chimney to attack. My wife, inside the house, heard the pitter-patter – i.e., heavy thumping – of my frenzied footsteps across the roof as I searched out safety in full retreat. I gave them a day to forget me before returning to the battlefront in a surprise attack with a couple cans of Raid.
While this was not one of my most enjoyable projects, the end result is among my favorite. My wife will tell you just how much I love the new look of the chimney, as I may have been known for weeks (or months?) on end to tell my family members to “look at that chimney!” as we drove up to the house. Okay, fine… I still do that. I may have also asked my neighbor to cut down her trees so it can be admired by all who drive toward the house from the other direction.
The Rebuild

The Glue 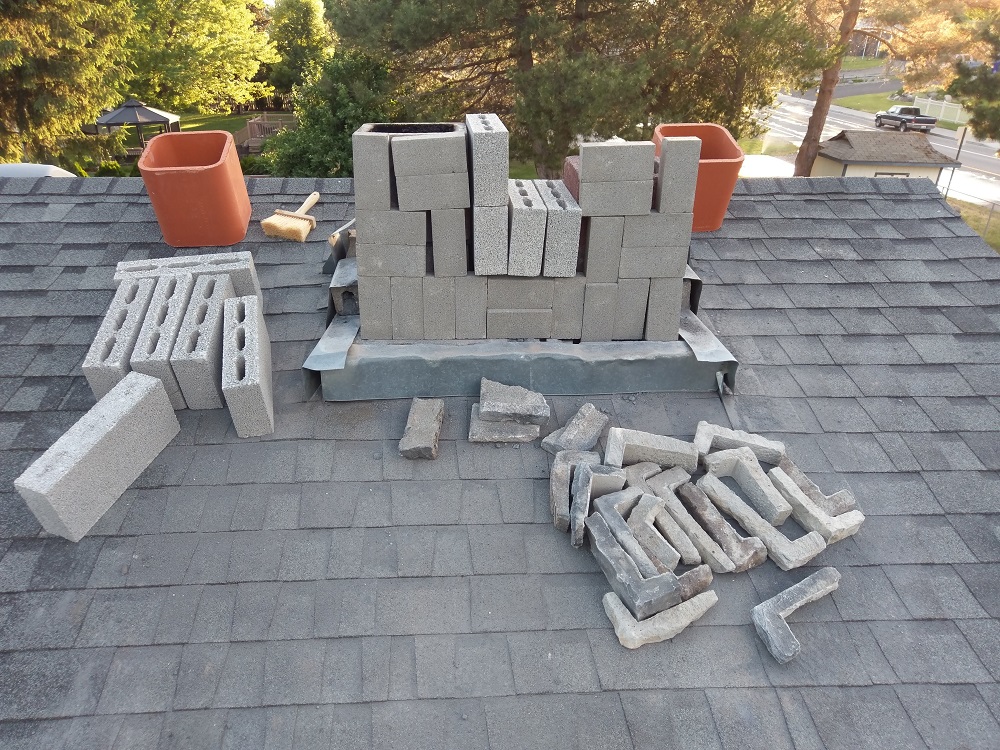
Rebuilding the Front

Spray Painted Flue Liners and Scratch Coat

More… 
…Scratch… 
…Coat
Setting the Stones

Corner Stones

Testing Rain Sill Placement

So Many Unused Rocks 
Cleaned the Roof

Getting There 
Rain Sills Placed

Sill Joints Filled and Crown Cement
The Final Look

Front View 
Side View

Side and Rear View

Rear View 
Other Side 
Last One

Final Street View
Before and After

Infinite Sadness
Infinite Gladness
So, I take it ‘type S mortar’ holds those pretty babies in place for eternity? I learn something new with each blog! What a distinguished looking chimney you have there. Santa will surely not miss this one!
ps. Glad you did not find weak spots in your frame while stomping across the roof in fervent escape from the squatting beasts!
I can feel your pain, and victory. Normally, I prefer to announce proudly my predicted time and cost of a project. After I fall far behind both, I then announce the associated unforeseeable circumstances which cause the cost overrun and delay however, the structure will now be far better off because I was able to reverse the shoddy job the last poor novice sap created.
jIApAuUotVuMUCgMokPn
CowzkVYRzEviubpwyoQ
JOJbRLYqRrHzfRDw
YmKtqONexaaRNXSPb
FGdkheccQQBQpyfprn